25. How to zero
“Gun must be off.” You’ve heard it too—this shopworn excuse for poor shooting.
Truth is, a gun is not a flashlight with an on-and-off switch. Nor do bullets land on or off the target by themselves. What the fellow meant was that his scope reticle was not adjusted to bring his line of aim into the bullet’s arc at a certain range. That adjustment is called zeroing. Zero range is the distance at which line of sight and bullet trajectory coincide for the second time.
A rifle cannot be manipulated to change the bullet’s path; the scope alone can be adjusted. So in fact zeroing is a sight function. Windage and elevation adjustments move the scope’s reticle so it directs your eye to where the bullet is at a given distance. You pick the range.
Because a bullet follows the bore axis out the muzzle, it will fly nearly parallel to the line of sight until gravity pulls it noticeably off course. Bear in mind that a bullet’s path is never straight. The projectile yields to gravity as soon as it leaves the rifle. Zeroing, you adjust the sight so your straight line of vision intersects the bullet’s parabolic path not far from the muzzle, then travels below it until the two merge at the zero distance. Beyond that, the bullet drops ever more steeply away from line of sight.
To make efficient use of time and ammunition, you’re smart to separate zeroing into two stages: bore-sighting and shooting. Bore-sighting isn’t necessary; it’s merely a short-cut to the end of the shooting stage. Shooting is necessary. A rifle that is bore-sighted only is not zeroed!
Before zeroing, adjust the focus of the scope’s reticle by rotating the eyepiece. Then leave it alone.
In the field, protect your rifle’s zero by keeping the firearm cased until you’re ready to carry it.
By the way, factory technicians can roughly align iron sights, but they can’t know which load you want to use, or at what range you want to zero; and they may not see the sights the way you do. You can’t farm out the job of zeroing a scope either, because you’re unlikely to find someone who holds a rifle quite like you do, or sees the scope field quite the same.
An intelligent first step is to find your load in ballistics tables. Knowing the bullet’s arc, you can determine the most useful zero range and correct holdover for longer shots.
It’s possible to adjust the scope so your line of sight comes tangent to the bullet’s arc, but a better practice is to thread the line of sight through the arc. Two intersections give you a zero range at the second crossing. If you’re a target shooter, you may well want to re-zero each time the target distance changes on the course. As a hunter, that’s impractical because shots can come quickly, and you’ll seldom know the exact yardage. So before zeroing, specify a maximum gap that you’ll tolerate between line of sight and the bullet’s arc at mid-range (between crossing points). In other words, adjust the sight so the sight-line stays close enough to the arc that you can ignore the gap between first and second bullet crossings. For big game hunting, many riflemen tolerate a mid-range gap of 3 inches. If a bullet hits 3 inches above point of aim on a deer’s chest, you’ll still kill the deer. By the same logic, you should be able to hold center on big animals to the range at which your bullet drops 3 inches below sightline. This is maximum point-blank range. Fast, flat-shooting bullets have a longer point-blank range than do slow bullets that drop quickly.
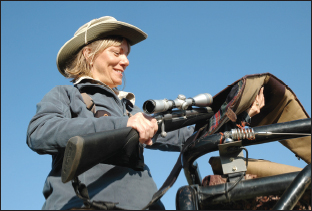
Donna Gulden uses a rest to check her rifle’s zero on safari. The exercise also boosts confidence.
The first intersection of sight-line and bullet arc is pretty close to the muzzle. The exact distance depends on the ballistic performance of your bullet, your chosen zero range and the height of the sight over the bore. The best zero for a .30-30 carbine may have less to do with the limited range of the cartridge than the more limited range at which you can shoot accurately with its iron sights—or the even more limited distance you can see in the cover you generally hunt! Remington tables show 170-grain .30-30 Core-Lokt bullets 2 inches high at midrange for a 150-yard zero. A 200-yard zero pulls those bullets nearly 5 inches above sight-line at midrange. While the 150-yard zero seems the best choice, a 100-yard zero may be even more practical, especially if you hunt in dense timber and most of your shots come very close.
Faster bullets give you longer zeros. At 100 yards, a sleek 180-grain .30-06 bullet hits roughly 2 inches above line of sight with a 200-yard zero. At 300 yards it’s 8 inches low. The top of the arc comes a little beyond the 100-yard point (remember, the arc is parabolic). With this load, you could zero your rifle a bit beyond 200 yards, increasing maximum point-blank range. If you’d accept a 3-½ inch mid-range gap, you could zero at 225 yards and stretch point-blank range to nearly 300. A .300 Weatherby, whose 180s leave at a scorching 3,250 fps, is easily zeroed at 250 yards. Maximum point-blank range exceeds 300.
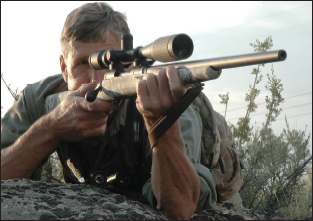
Attaching a scope, be sure you get enough eye relief in prone, which pushes your face forward.
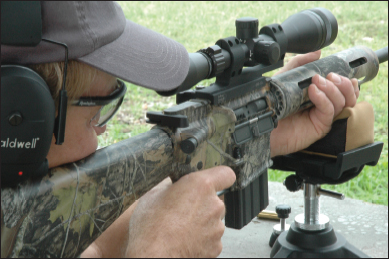
Bench technique must be consistent. This rifleman holds the forend firmly on a lightweight AR.
Sight height affects zero because it determines the angle of the sight-line to bullet path. Ballistics tables typically specify a 1-½ inch gap between bore and sight-line at the muzzle. A flat line of sight will cross the arc a second time closer than will a sight-line raised by high scope mounts or an AR-style rifle.
I zero almost all my big game rifles at 200 yards. When the animal is farther than my maximum point-blank range of 250 yards or so, I shade a bit high. A top-of-the-back hold with my .270 brings down the curtain on deer to 350 yards. Firearms and ammo designed for close shooting—Marlin lever guns in .45-70, for example—are best zeroed inside 150 yards.
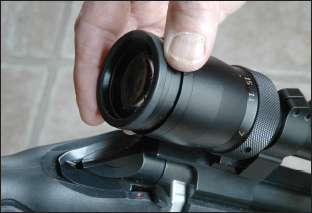
Before you start a zeroing routine, make sure the scope is mounted firmly, the base screws tight and the rings secured to the base. Dovetail rings are best turned into alignment with a 1 inch dowel; don’t use the scope for this or to check ring alignment. When the scope drops easily into the belly of horizontally split rings, slip the tops of rings over the tube, but don’t snug them. Shoulder the rifle to see that the reticle is square with the world and you have the proper eye relief. You should see a full field of view when your face rests naturally on the comb. I like the scope a little farther forward than most shooters, for two reasons: First, when I cheek the rifle quickly, I want the field to open up as I thrust my head forward. I don’t want to waste any time pulling it back to see more through the scope. Secondly, I want room between the ocular bell and my eye should I have to shoot uphill or from the sit hunkered over the rifle. My rule of thumb is to start with the ocular lens directly over the rear guard screw on a bolt rifle, then refine.
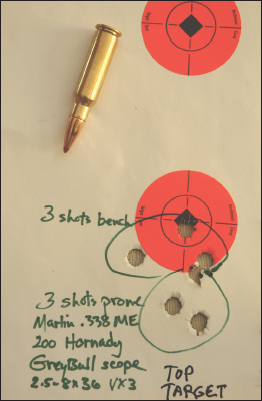
The low group here was fired at the top target prone, after zeroing from the bench at the bottom target. Note the 6 inch difference in impact caused by pressure from a tight sling on the barrel!
After you lock the scope in place by cinching ring screws (alternately, as you’d tighten lug nuts on an automobile hub), secure the rifle in a cleaning cradle or sandbags or a shooting rest like Midway’s Lead Sled. You’re ready to bore-sight. No need to be at the range, only someplace that affords you a clear view of a small, distant object. First, remove the bolt. Then, looking through the bore, align the barrel with your object of choice. It can be anything, from a rock to a paper target—something one you can easily center in the bore. Without disturbing the rifle, adjust the scope until the object also falls on the aiming axis. I often bore-sight on a transformer box atop an electrical pole. It’s about a mile away, but the box is clearly visible. There’s nothing unsafe about this, because the bolt is necessarily out of the rifle!
The other way of aligning sight with bore is with a collimator, an optical device you attach to the rifle’s muzzle by means of a close-fitting stud that slides into the bore. The collimator’s screen appears in your sight-line. On common versions, you adjust windage and elevation dials on the scope so the reticle centers the screen’s grid. The collimator’s main advantage: You can use it on rifles with bolts that aren’t easily removable. Special collimators are necessary for rifles with muzzle brakes that are best left in place.
While bore-sighting saves time and ammo, it’s no substitute for shooting. A rifle bore-sighted is like a new automobile before its wheels are aligned. It is fully assembled, with the parts roughly oriented.
You don’t need first-cabin range facilities to zero. Or commercial target faces. For targets, I prefer cardboard slabs with white paper squares. For most iron sights at 100 yards, a sheet of typing paper works fine. For a 4x scope, I use 6 inch squares, for a 6-x scope, 4 inch squares. The white paper shows up plainly against brown cardboard, and holes are easy to see wherever the bullets land. Black lines and bullseyes hide holes. Not to disparage commercial targets. Fluorescent stick-on dots excel for high-power scopes. Targets designed to show a rim of fluorescent color around each bullet hole—Birchwood-Casey’s Shoot-N-C and Caldwell’s Orange Peel—make hits easy to spot at distance.
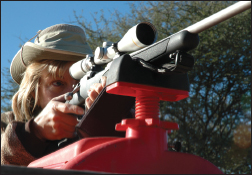
An adjustable rest helps you shoot well because with it you can position the rifle exactly, bringing its natural point of aim to the bullseye. You can then relax behind it. If you must hold the rifle on target, you introduce muscle tension, pulse and nerve tremors that can kick your bullet off course. Sandbags are OK, but positioning the rifle the same, shot to shot, is more difficult with sandbags. Consistency matters!
In most cases, your rifle is best supported on a firm but forgiving rest just behind the forend swivel and at the stock’s toe. Protect sandbags from swivel studs during recoil by wadding a washcloth in front of the bag. Never zero a rifle with the barrel touching a rest! The barrel will vibrate away from the rest and throw the shot wide. I use my left hand to pull the forend of a lightweight rifle into the rest from behind. You can also tug the sling, which pulls the rifle into the rest from the front. With heavy-barreled rifles, it’s usually better to put your left hand instead on the rear bag. A little hand pressure here can shift the rifle just enough to bring the sight to the exact center of the target. The rifle’s mass will deal with the recoil.
I’ve heard snickers when swathing my shoulder in extra padding. “Can’t take it?” Well, yes, I can take it. But my purpose behind the rifle is not to see how much recoil I can absorb. It’s to shoot accurately. Zeroing, you’ll want to minimize the human element. To flinch is human. For the same reason, you’ll want still air. Wind adds a variable that is best dealt with after you’ve established a zero.
First shots to zero should be at 35 yards, whether or not you’ve bore-sighted. You can’t make any changes until you see exactly where bullets hit. After each shot at 35 yards, move the rear sight or scope dial in the direction you want the bullet to go until you hit point of aim. (Mind the dial arrows! European scope knobs typically turn clockwise to move impact up and right, while clockwise rotation on scopes built for the American market moves impact down and left.) Now switch to a 100-yard target. For a 200-yard zero, your bullets should print just above point of aim at 100 (I prefer 2 inches to 3). In the last stages of zeroing, make sight changes after three-shot groups. A single shot can be misleading.
Dial “clicks” or graduations are specified in inches of movement at 100 yards. Call them minutes of angle. A minute of angle is actually 1.047 inches at 100 yards, but it’s commonly rounded to an inch. At 200 yards, a minute is 2 inches, at 300 it’s 3 inches. Scope adjustments with quarter-minute clicks move point of impact an inch with every four clicks at 100 yards. A target scope may have graduations as fine as 1/8 minute; scopes intended for long shooting incorporate coarser elevation detents—half-minute or even 1-minute clicks—to lift point of impact with less dial movement. Advantages: faster adjustment and greater range of adjustment. When you can’t turn the dial past zero, you also avoid the possibility of “full rotation” error, which can cause spectacular misses.
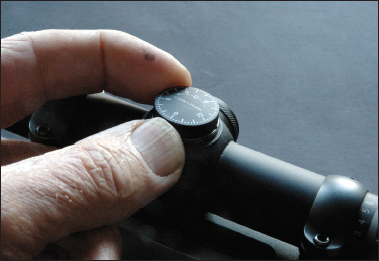
Finger-friendly dials, here on a new Redfield, make zeroing easier. Assume quarter-minute clicks.
As fast as counting clicks is to secure your rifle so the sight centers the target as it did when you last fired. Then, without moving the rifle, turn the dials until your reticle kisses the previous bullet hole.
Group size is partly a function of rifle and load. But mainly it’s a function of how still you hold the rifle and how well you execute the shot. Even with a benchrest, it’s easy to make a bad shot. In fact, a bench can give you a false sense of stability, prompting fast, sloppy shooting. No matter how steady you think you are, check your position before each shot and fire carefully. Call your shots. To check your zero and refine, fire at 200 yards, then 300. For hunting, that’s as far as you’ll likely have occasion to shoot. If longer pokes are on the agenda, find a place to test your rifle (and your hold!) at extended range.
Tactical rifles chambered for the .338 Lapua and .50 BMG and built for use with match bullets at extreme range have been joined by sporting rifles with exceptional reach. Zeroing at long range introduces a couple of special considerations the average deer hunter needn’t consider. One of them is the range of dial movement on the scope’s elevation adjustment. Consider installing a slanted Picatinny rail—one whose front end is lower than the rear. Such a rail is said to have “gain” and puts the scope at an angle to the bore, so when you center the elevation adjustment dial in its range, the scope’s axis (your line of sight) crosses the bullet’s arc farther downrange. You get a longer zero without using all the adjustment. The closer to center you keep the erector assembly (the tube that holds your reticle inside the scope), the better. A lens gives you the best picture through its middle. Barrett supplies rails with gain for its 50-caliber rifles.
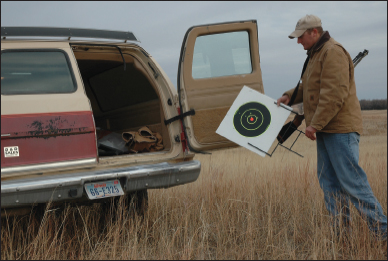
Before hunting season, take a target frame to the hills and check your zero. Confidence matters!
Tactical rifles with bipods are best zeroed from them, rather than from sandbags or a commercial rest. Sporting rifles can also be zeroed from a bipod, or from a sling. You don’t need a one-hole group. The purpose of zeroing is to align the sight with a repeatable bullet track. If you use a bench to zero a hunting rifle, follow up by getting off the bench to check zero from hunting positions. I shoot a lot with a taut sling. Typically, the sling pulls the rifle down and left. One .30 magnum put a sitting group 9 inches below the group I’d fired from the bench! A barrel-mounted sling swivel exacerbates this problem. So does a swivel on the forend cap of a lever rifle with its magazine tube dovetailed to the barrel up front. Not long ago, after confirming a 100-yard zero at the bench, I slinged up my Marlin 1895 in .338 Marlin Express and fired three shots prone. They formed a 1 inch group 6 inches below point of aim! When my bench zero differs a great deal from where my bullets hit from prone with a tight sling, I adjust the sight to accommodate the prone group.
Keep the barrel cool. I fire no more than 10 shots before setting the rifle aside, bolt open, to bring bore temperature down. If I must take more than 30 shots, or if groups open up, I clean the bore. Bringing two or three rifles to the line makes sense. A second and third keep you occupied while the first cools.
After zeroing, thoroughly scrub your rifle’s bore and follow with a lightly oiled patch. If you have time to let the barrel get stone-cold, shoot then at 200 yards to check point of impact. Pay attention to the first and second shots. Those are the shots that count on a hunt. Save that target. Next time at the range, fire another cold-barrel shot at that target. Composite first-shot groups from different days on the same target should form a tight knot.
If you don’t zero carefully, or check zero often, you may be hunting for a shot you can’t make.
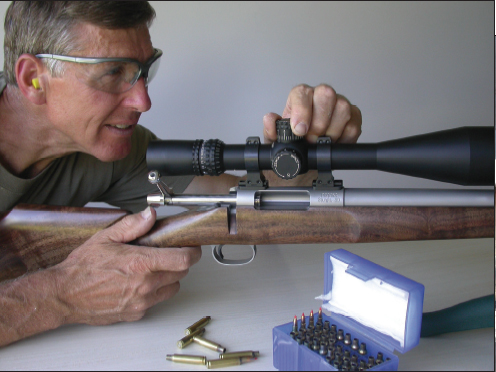
Adjusting a high-power Nightforce scope, Wayne refines zero. Target knobs make it easy.
Table of contents
- Title Page
- Dedication
- Copyright
- Acknowledgments
- Foreword
- CONTENTS
- INTRODUCTION
- SECTION I: BALLISTICS IN HISTORY
- SECTION II: THE MUSCLE BEHIND THE SHOT
- SECTION III: BULLETS—THE INSIDE STORY
- SECTION IV: SPEED, ENERGY, AND ARC
- SECTION V : PUTTING BALLISTICS TO WORK
- SECTION VI: FOR LONGER REACH
- BALLISTICS TABLES FOR MODERN SPORTING RIFLES
- GLOSSARY